GTM Tracking for Web Containers
This article will describe Google Tag Manager (GTM) instructions for Web Containers. If you are using Google AMP, please see our instructions for AMP containers.
Parse.ly provides a single tag template designed to make it easy to integrate tracking onto your website. You can install the tracker, define custom audience segments, configure conversion event tracking, and dynamically track page views all from within your current GTM container.
Prerequisites
- You will need to know your Parse.ly Site ID(s)
- Optional – create a Site ID variable to send testing data to your sandbox
- If you’ve already added the tracking code by another means (such as the WordPress plugin), you should be prepared to disable that other means of tracking to avoid double counting page views. Not sure? You can use our testing instructions to see if page views are firing right now.
Adding the template
You can find the Parse.ly tag template in Google’s Community Template Gallery. To add the template to your GTM container, click the Add to workspace button in the top right of the tag template page.
You can also add the tag template from within your GTM container:
- Navigate to the Templates section on the left.
- In the Tag Templates section, click the Search Gallery button.
- Search for “Parse.ly” and click on the tag you want to add to your container.
- Click the Add to workspace button.
Using the template
There are three types of functionality within the Parse.ly tag template:
- Install the tracker (with custom audience segment data).
- Fire self-managed conversion events.
- Fire dynamic tracking pageviews.
You can choose the type of tag you want to use from the Tag type dropdown:
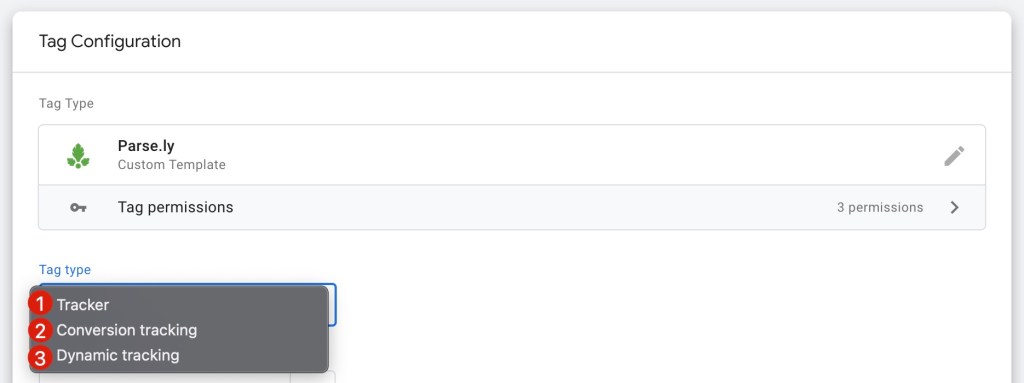
Tracker
Use the Tracker tag type to add the Parse.ly tracker to your site. You can include custom audience segment data within this tag.
- Add your Parse.ly Site ID to the Parse.ly Site ID field. (Preferably, use your Site ID variable)
- (Optional) If you have custom audience segment data you would like to provide, follow our audience segment instructions for GTM.
- (Optional) If you don’t want to send a pageview when the Parse.ly tracker loads, expand the Additional features section and click the Disable autotracking checkbox. You may want to do this if your site is a single-page application and you want to manually trigger pageviews with our dynamic tracking tag instead of Parse.ly’s built-in SPA tracking.
- Click in the Triggering section and select the trigger you wish to use for this tag. A good rule of thumb: use the same trigger(s) you already have configured for Google Analytics or other trackers. Otherwise, just choose the standard All Pages trigger.
- Give the tag a descriptive name and click Save, and then publish your container.
The Parse.ly tracker will now deploy through Google Tag Manager on your site. You can validate your integration using your browser’s network tab to see the pageview events firing and validate the custom audience segment data in those events.
Important note for customers upgrading from a previous version of the template
You may need to manually re-enter your Parse.ly site ID and segment data in the Parse.ly tag before deploying the update to production.
Next Steps
- Does everything work? Use our testing instructions to verify that one, and only one, page view goes to Parse.ly with each page load.
- Set up your metadata (not available via GTM).
- Check to see if there’s more to set up in GTM that applies to you:
- Return to the Integration Overview page to ensure you’ve completed everything
Last updated: June 03, 2024