GSC integration steps
This documentation walks you step by step through the process of integrating your Google Search Console with your Parse.ly dashboard.
Please read this document in its entirety. It’s not a complicated process, but there are steps you need to follow exactly.
Once the integration is complete, Google Search Console will send data to Parse.ly. Google updates this data on a 24-hour time frame, so it’s not real-time like the rest of Parse.ly data—because it is sourced from Google, and not from our proprietary tracker.
In order to complete this integration, you need two people:
- Someone with administrative access to your Parse.ly dashboard
- Someone with Administrative access to your Google Search Console. Google’s UI here is not very clear and frequently confuses people. Please make sure you have the person with Admin privileges to the Google Search Console account.
In both cases, you can be a “user” but not have admin privileges. Once you have both of those people ready for the integration, you can proceed.
If you do not know who the admin of your Google Search Console account is, that is where you start. It is probably someone in your SEO team.
Step one: Contact Parse.ly support to request access to the Google Search Console feature
You do not have access by default. Our team needs to enable the feature that allows you to integrate and view Google Search Console data within the Parse.ly dashboard.
Send an email to support@parsely.com requesting access to Google Search Console features.
Note: If you have multiple web properties, please indicate whether you would like us to turn on the feature for your entire network, or only for a specific site.
Sending this email will enter you into a queue of customers to whom we will be granting access in batches.
Step two: Receive confirmation from Parse.ly support
We will be granting access to the Google Search Console Integration feature set in batches, starting September 2, 2024. How long it will take to work through these batches depends on how many of our customers request access.
When you receive an email from Parse.ly Support saying that the feature flag has been turned on for your site or organization, you may proceed with the rest of this integration.
Step three: Generate a Service Account for your Google Search Console account
Parse.ly needs access to your Google Search Console. To gain access, Parse.ly generates a brand new email address, and you add this email address as a user to your Google Search Console account.
This email is the “Service Account” that connects our system to your Google Search Console.
You can generate this Service Account on the Preferences page of the Parse.ly dashboard.
Note: This is set up at the site level in your dashboard. If you don’t see this section in your Preferences pages, ensure that you are not at the network level.
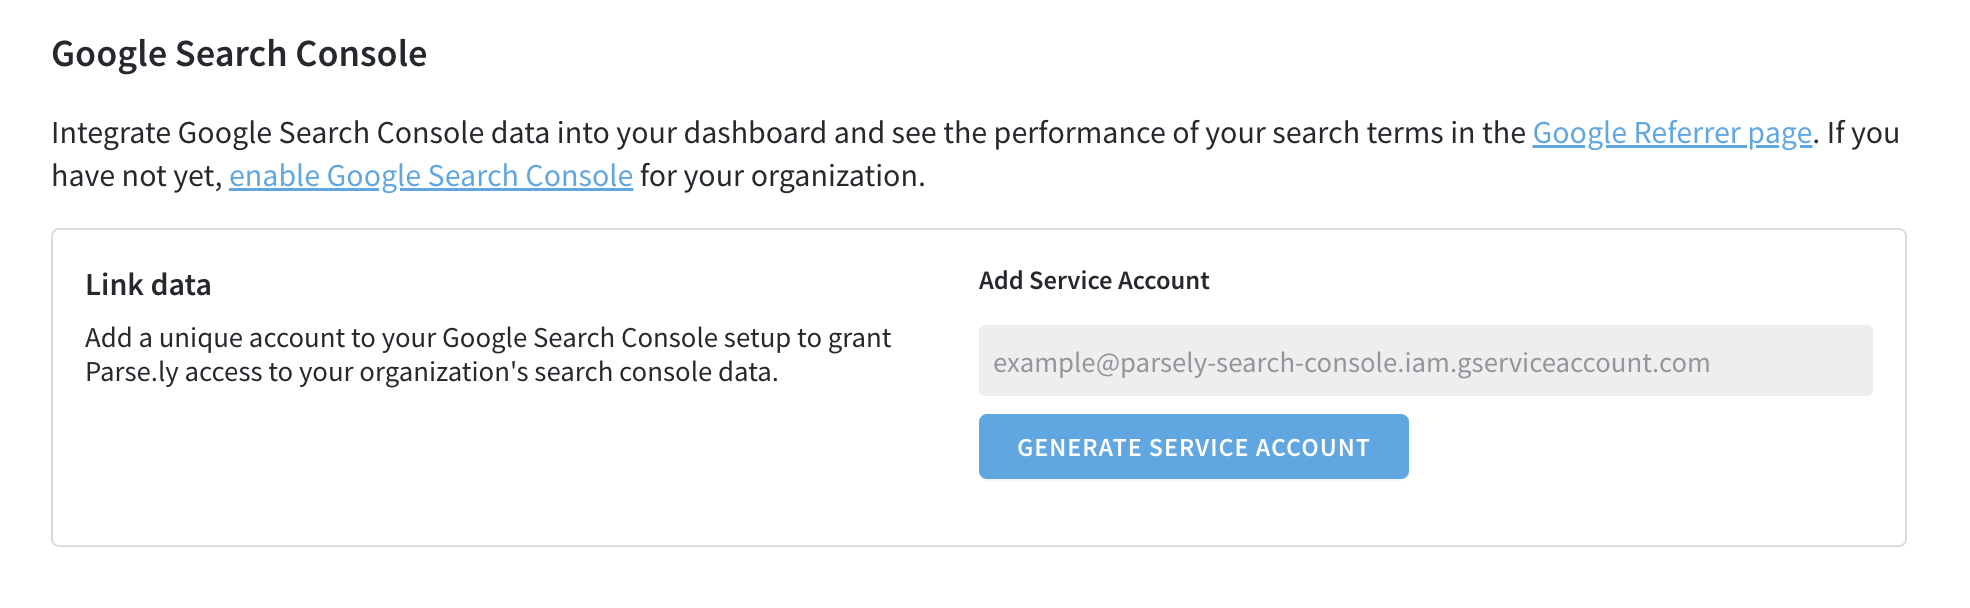
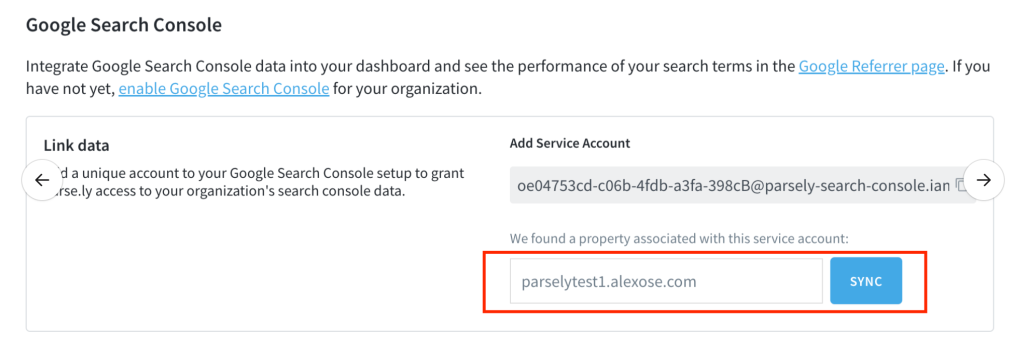
This is what it looks like when your service account has been generated:
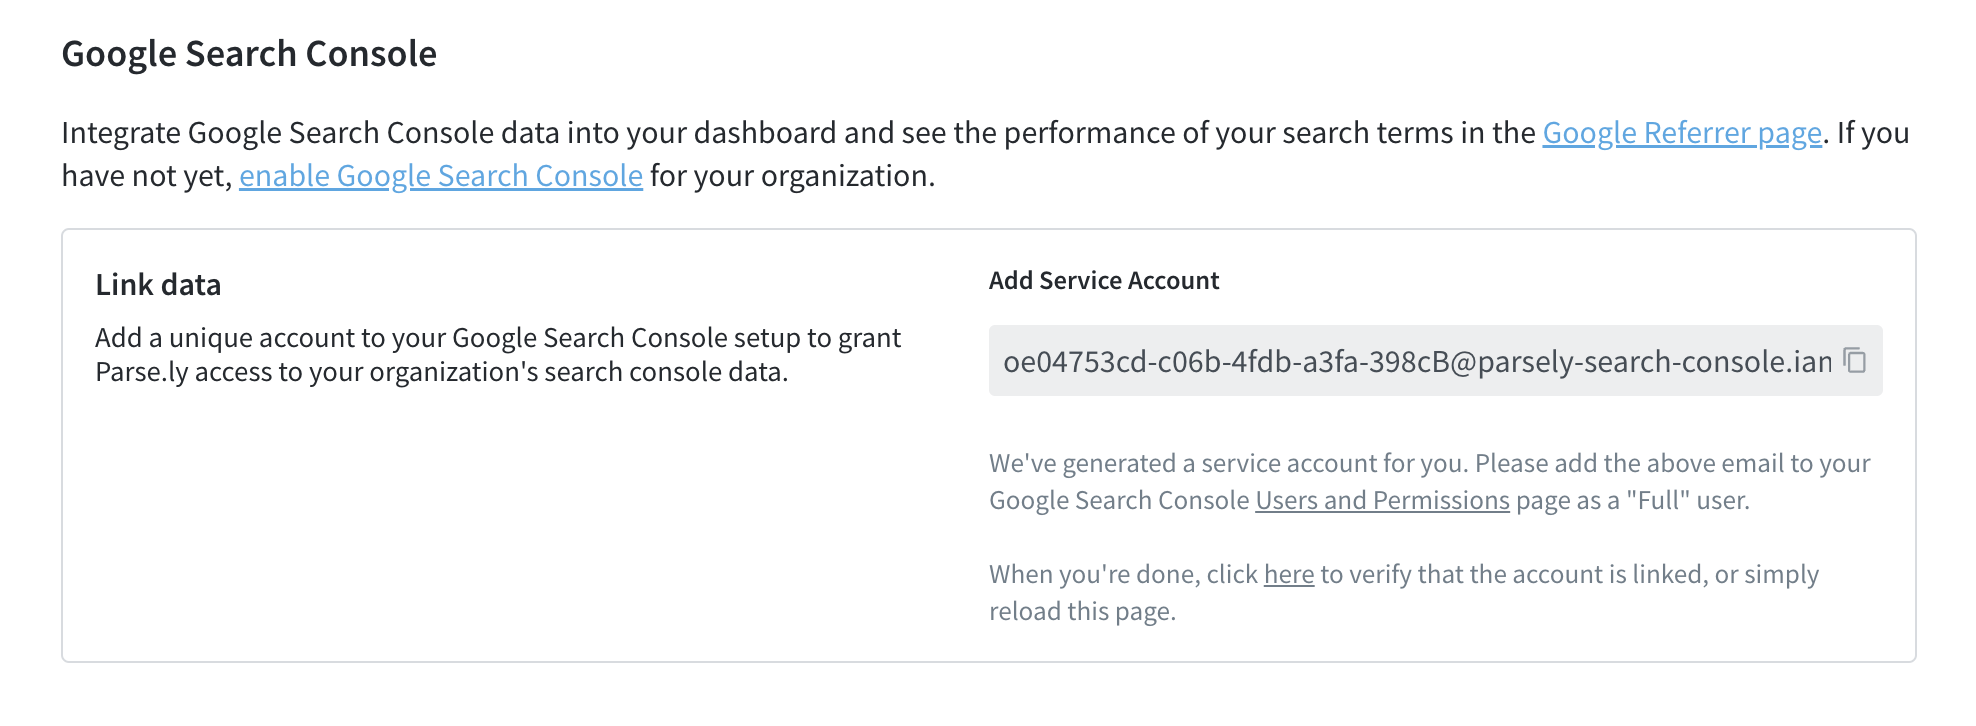
Keep this tab open in your browser because we are returning to it soon!
Step four: Add the Service Account to your Google Search Console account
In this step you take the Service Account we’ve generated and add it to your account profile within Google Search Console’s UI.
This step can be misleading: Google Search Console does not show you this screen unless you are an admin, and it is not always very clear about who is and who isn’t an admin.
Please double-check that you are an admin user of your Google Search Console.
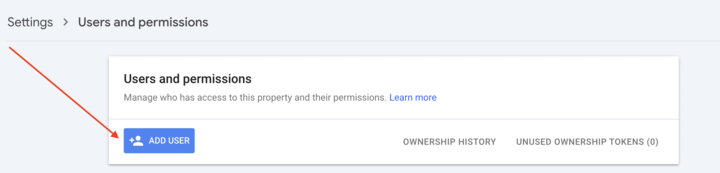
Once you open up Google Search Console, navigate to the Settings page, and then the Users and permissions page. Click ADD USER.
Then copy and paste the Service Account email address into the bar, and assign Full permissions.
The Service Account MUST have “Full” permissions.
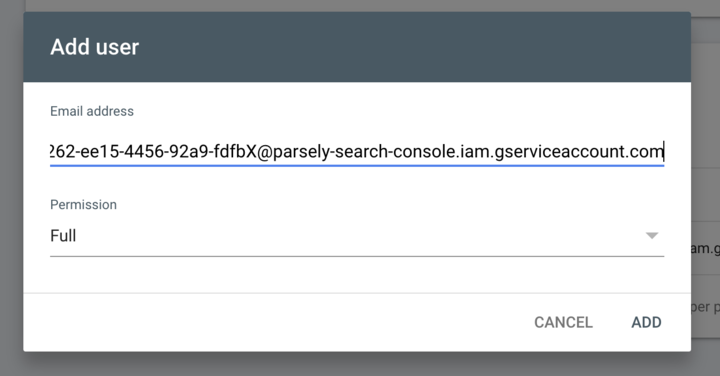
This is what it looks like once you have successfully added a service account:
Note on credential safeguards
We store credentials in an encrypted format that are only accessible to the systems responsible for retrieving and processing GSC data. We ensure credential protection with secure key management, periodic key rotation, and other best practices of the industry.
Step five: In the Parse.ly dashboard, select and sync your Console property
This step MUST happen AFTER you have given access to the Service Account within the Google Search Console admin user interface.
Back in the Parse.ly dashboard Preferences page, we will try to get the properties associated with the service account you added.
If we find a property, it will be auto-updated in the property field, as shown below. If there is more than one property, you should select the right one.
If we do not find any properties, you will need to check the service account addition in Step Four.
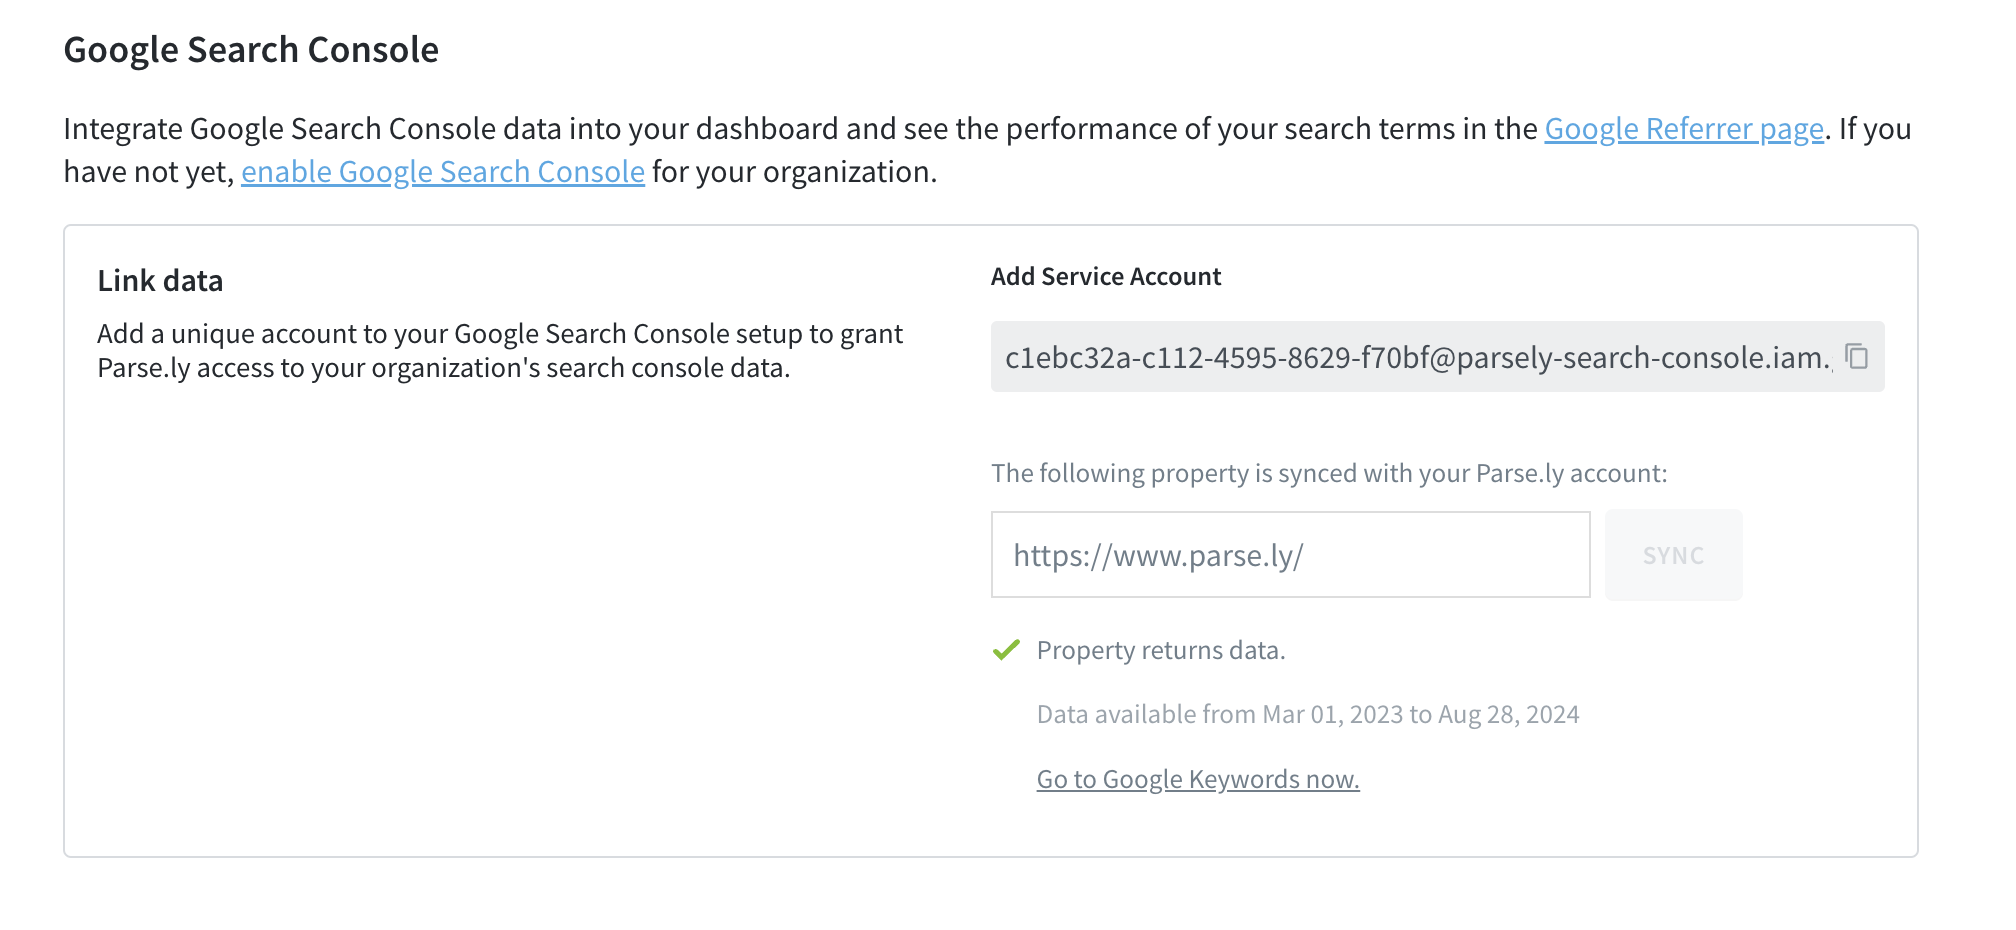
When you hit “SYNC,” we verify that data is actually passing into the service account. This triggers a process where we begin fetching historical Google Search Data and storing it in our system. This is called “backfilling the data.” We begin with the most recent days, and continue backwards into further and further historical data. Then, going forward, we request updates within 24 hours as new data is created.
This is what it looks like when you have successfully saved your Console Property:
You are now integrated with Google Search Console!
The data will take some time to populate: you will not see it immediately.
Depending on the amount of data, you should start seeing Google Search Console data show up in your dashboard over the next few hours to days as we populate all your historical data. Going forward, Google Search Console data will update within 24 hours.
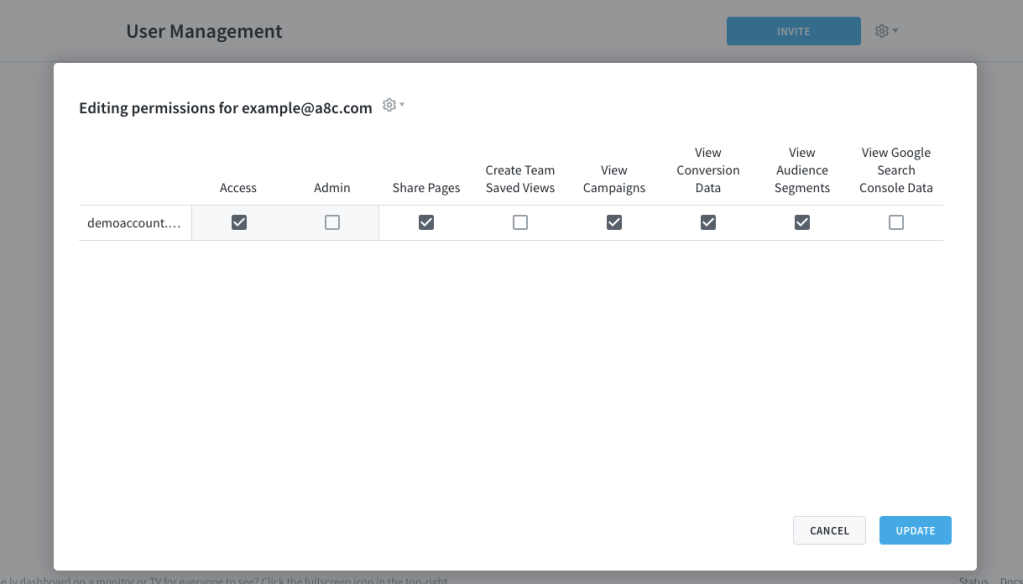
Step six: Give other users access to the Google Search Console feature
Similar to how other features in the Parse.ly dashboard are accessed, only users who have been given explicit access to the Google Search Console feature will be able to use it.
An Admin can grant users access in the User Management section. Simply click on a user and enable the ‘View Google Search Console Data’ option for them.
Last updated: June 05, 2025